The good news is it is possible and even better, it's not that difficult to do once you do some initial setup. In fact I'm shocked that Adobe hasn't addressed this themselves as their export to pdf option from Fireworks is pretty much worthless in my opinion. Enough of me venting though. Onto the solution.
First a summary of how this works. By default Adobe Acrobat has a Custom Resolution setting set at 110 pixels/inch (found under Edit>Preferences>Page Display). This needs to match the resolution of the files you create. Most designers that I know don't work at 110ppi but when working on something destined for the screen, the resolution really makes no difference (just the actual number of pixels). You could tell everyone who views your PDF to change their Acrobat Resolution setting to 72, 96 or whatever your ppi of choice is but the more obvious solution is to start working at the default 110 resolution to begin with. Trust me, it won't make your files larger or look any different as long as you don't change the actual number of pixels wide by tall. Very few people know or care that this setting exists in Acrobat so you can pretty much count on 110ppi being the setting on your clients system.
Alright now that you understand the resolution bit, let's move onto some settings in Adobe Acrobat. You will only have to set these up one time on your system. Open up Adobe Acrobat (of course you will need the full version...not just the viewer). Note that my directions and screen shots are for Adobe Acrobat 9 Pro but should be similar on other versions.

- Select Edit then Preferences
- Under Categories: click on Convert To PDF
- Under Converting To PDF click on PNG
- CLick the Edit Settings button
- Under Compression use the drop down by Color to select JPEG (Quality : Maximum)
- Click OK button to save and close Adobe PDF Settings
- Click OK button to save and close Preferences
What this does is tells the program that any time you use Acrobat to convert or combine color PNG files, you want it to compress them very little keeping most of the quality. Of course this makes for bigger file sizes but I prefer that then having a client become distracted by jpg noise which becomes more obvious in screen captures then it would in a photograph.

So now that you have Acrobat all setup, you should create or save out your 110ppi mockups as individual PNG files. It's also helpful if you number them sequentially. I usually export them all to a new folder where I can then select all of my PNG files that I want to combine into a PDF. Then I right-click the files and select Combine supported files in Acrobat..... Note that it also works to combine them in Adobe Acrobat once the program is open but this way just seems easier to me.

A Combine Files window opens in which you can reorder your files if desired. Once you have them ordered, click the Large File Size button found at the bottom right of the window (just above the Cancel button). Then click the Combine Files button and wait a few seconds while Acrobat converts the files into a single PDF.
You are now basically finished but there is one more step that I always make sure I do. With the newly combined PDF open...
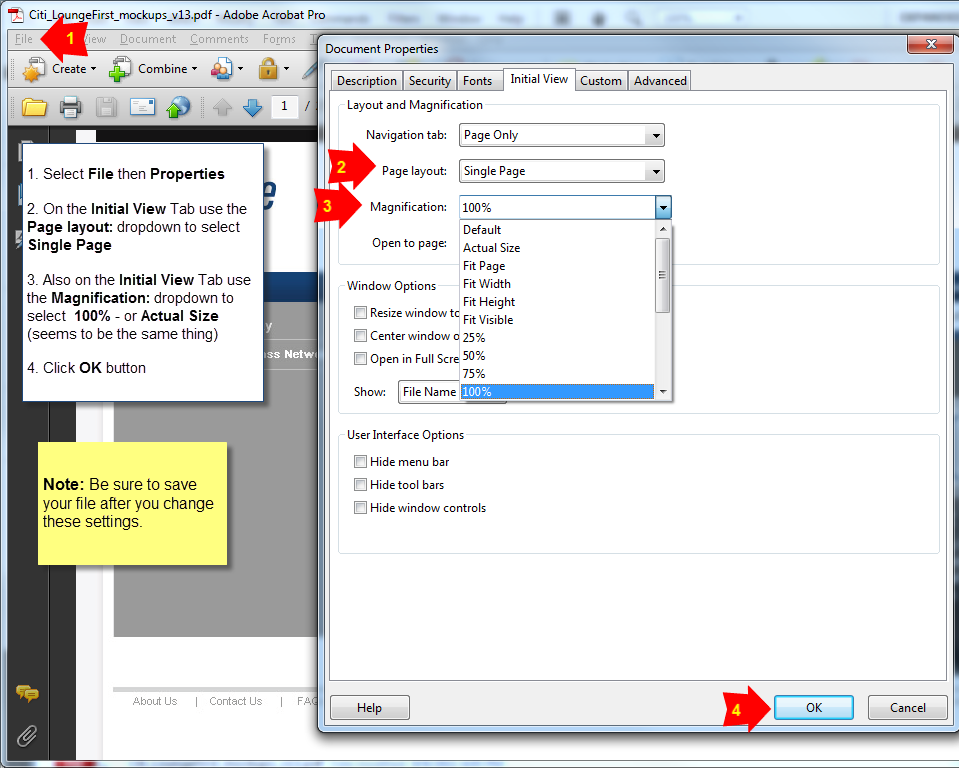
- Select File then Properties
- On the Initial View Tab use the Page layout: dropdown to select Single Page
- Also on the Initial View Tab use the Magnification: dropdown to select 100% - or Actual Size (seems to be the same thing)
- Click OK button
- Be sure to save your file after you change these settings
This forces the file to open up scaled to 100% so you can be very confident that your client will open the file and see exactly what they should expect to see on the finished website. It really does impact a client's perspective of a design if they are viewing it at a reduced or enlarged size so you want to be as accurate with this as possible.
And there you have it. Your PDF mockups have never looked so wonderful and depending on the number of pages and there size, you can can now create them in a matter of seconds for you client in a matter of seconds.
