Learn one way to easily correct the color temperature of an image using the black point eye dropper in a levels adjustment layer giving you more realistic and dynamic colors.
Showing posts with label eMotion Design Tips. Show all posts
Showing posts with label eMotion Design Tips. Show all posts
Monday, September 29, 2014
Photoshop Tip - How correct color Temperature (White Balance) with levels
Learn one way to easily correct the color temperature of an image using the black point eye dropper in a levels adjustment layer giving you more realistic and dynamic colors.
Friday, August 24, 2012
Photoshop Tip - How to add a border to a photo
Wednesday, January 4, 2012
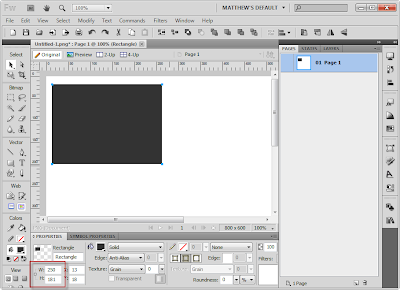
Fireworks Tip - Measure pixel width and height with guides
One of the great things about Adobe Fireworks is it's ability to quickly get accurate pixel measurements. Believe it or not, this can be a little bit of work in Photoshop but thankfully is a breeze in Fireworks. First of all it's worth noting that the pixel dimensions of any selected object (or layer) are always displayed in the Properties panel (see screen shot below).
 This is great but sometimes life gets more complicated. For these instances it's nice to know that you can pull guides out from the rulers and measure the distance between them holding down your Shift key. You will need to have the Pointer Tool (Black Arrow) selected when you do this. Then simply hold down your Shift key and move your mouse between the guides you want to know the distance between. You will instantly see both the vertical and horizontal measurements (see screenshot below).
 This is also handy to use when setting up Guides for mockups. If you know an area of your site mockup needs to be 300px across you can quickly drop a guide down to objects will snap to it. Holding down the Shift key while dragging a third guide in the middle will even show you the distance on either side of the new guide allowing you to find the middle point quickly. This an easy to use yet powerful and time saving feature. Once you get the hang of it, you'll wonder how you got anything done without it.
 This is great but sometimes life gets more complicated. For these instances it's nice to know that you can pull guides out from the rulers and measure the distance between them holding down your Shift key. You will need to have the Pointer Tool (Black Arrow) selected when you do this. Then simply hold down your Shift key and move your mouse between the guides you want to know the distance between. You will instantly see both the vertical and horizontal measurements (see screenshot below).
Tuesday, January 3, 2012
Creating PDFs that display mockups at actual size
Adobe Acrobat works great for sharing proofs for print projects but lets be honest. If you are creating mockups for a website or simply want to convert screen captures into a PDF, it can be quite frustrating. Doesn't matter if you use Photoshop, Fireworks or some other design program. Saving to, exporting or printing to a PDF is almost always sure to produce a blurry and noisy image. Also just as disturbing is the fact that Acrobat won't display the file at the same size as what you originally created it at but instead usually shows an enlarged version when you select 100% in Acrobat. Sure there are other ways to deliver mockups but the company I work for really prefers PDFs so I decided to figure out a reliable way to get a decent looking PDF of my site mockups. As I started researching for answers on the internet I was shocked at how little information there is on this. All I really wanted to do was have my PDF display muliple mockup images as pages at the same size and quality as if I exported them to PNGs...is that to much to ask?

The good news is it is possible and even better, it's not that difficult to do once you do some initial setup. In fact I'm shocked that Adobe hasn't addressed this themselves as their export to pdf option from Fireworks is pretty much worthless in my opinion. Enough of me venting though. Onto the solution.
First a summary of how this works. By default Adobe Acrobat has a Custom Resolution setting set at 110 pixels/inch (found under Edit>Preferences>Page Display). This needs to match the resolution of the files you create. Most designers that I know don't work at 110ppi but when working on something destined for the screen, the resolution really makes no difference (just the actual number of pixels). You could tell everyone who views your PDF to change their Acrobat Resolution setting to 72, 96 or whatever your ppi of choice is but the more obvious solution is to start working at the default 110 resolution to begin with. Trust me, it won't make your files larger or look any different as long as you don't change the actual number of pixels wide by tall. Very few people know or care that this setting exists in Acrobat so you can pretty much count on 110ppi being the setting on your clients system.
Alright now that you understand the resolution bit, let's move onto some settings in Adobe Acrobat. You will only have to set these up one time on your system. Open up Adobe Acrobat (of course you will need the full version...not just the viewer). Note that my directions and screen shots are for Adobe Acrobat 9 Pro but should be similar on other versions.

- Select Edit then Preferences
- Under Categories: click on Convert To PDF
- Under Converting To PDF click on PNG
- CLick the Edit Settings button
- Under Compression use the drop down by Color to select JPEG (Quality : Maximum)
- Click OK button to save and close Adobe PDF Settings
- Click OK button to save and close Preferences
What this does is tells the program that any time you use Acrobat to convert or combine color PNG files, you want it to compress them very little keeping most of the quality. Of course this makes for bigger file sizes but I prefer that then having a client become distracted by jpg noise which becomes more obvious in screen captures then it would in a photograph.

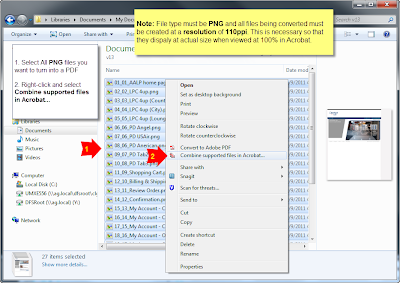
So now that you have Acrobat all setup, you should create or save out your 110ppi mockups as individual PNG files. It's also helpful if you number them sequentially. I usually export them all to a new folder where I can then select all of my PNG files that I want to combine into a PDF. Then I right-click the files and select Combine supported files in Acrobat..... Note that it also works to combine them in Adobe Acrobat once the program is open but this way just seems easier to me.

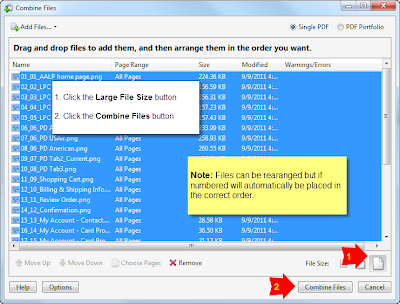
A Combine Files window opens in which you can reorder your files if desired. Once you have them ordered, click the Large File Size button found at the bottom right of the window (just above the Cancel button). Then click the Combine Files button and wait a few seconds while Acrobat converts the files into a single PDF.
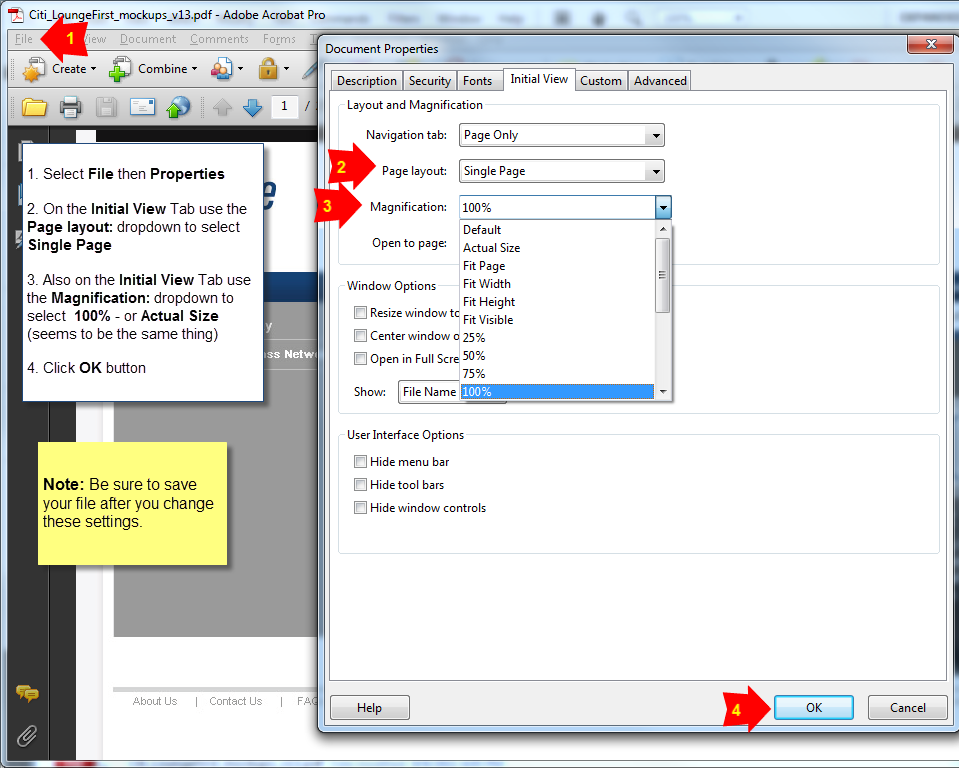
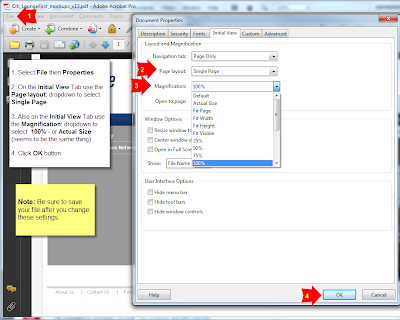
You are now basically finished but there is one more step that I always make sure I do. With the newly combined PDF open...
- Select File then Properties
- On the Initial View Tab use the Page layout: dropdown to select Single Page
- Also on the Initial View Tab use the Magnification: dropdown to select 100% - or Actual Size (seems to be the same thing)
- Click OK button
- Be sure to save your file after you change these settings
This forces the file to open up scaled to 100% so you can be very confident that your client will open the file and see exactly what they should expect to see on the finished website. It really does impact a client's perspective of a design if they are viewing it at a reduced or enlarged size so you want to be as accurate with this as possible.
And there you have it. Your PDF mockups have never looked so wonderful and depending on the number of pages and there size, you can can now create them in a matter of seconds for you client in a matter of seconds.
Friday, May 28, 2010
Monday, May 24, 2010
Photoshop Tip - How to make an image black and white with some color
Learn one way to make an image black and white with select areas still in full color in Photoshop using masking techniques.
Thursday, May 20, 2010
Photoshop Tip - How to convert a color image to black and white
Learn one way to convert a color image to black and white in Photoshop using a gradient map adjustment layer. Let me know in the comments if you have any questions.
Tuesday, May 18, 2010
Photoshop Tip - How to fade image to solid color
Learn one way to fade a photo image to a solid color in Photoshop using an adjustment layer and gradient mask. Let me know in the comments if you have any questions
Subscribe to:
Posts (Atom)
